In this project, we will be using NodeMCU ESP8266, DHT11 Sensor and ThinkSpeak Server with a WiFi connection.
Introduction to Resources:
NodeMCU ESP8266:
NodeMCU is an open-source LUA language-based firmware developed for ESP8266 wifi chip, although many students make the mistake of thinking the ESP8266 to be the entire chip name whereas it is just the WiFi module. By exploring functionality with ESP8266 chip, NodeMCU firmware comes with ESP8266 Development board/kit i.e. NodeMCU Development board.NodeMCU Dev Kit/board consist of ESP8266 wifi enabled chip. The ESP8266 is a low-cost WiFi chip developed by Espressif Systems with TCP/IP protocol.
Here fo this project I've used Version2 (V2) NodeMCU Dev Kit i.e. NodeMCU Development Board v1.0 (Version2), although there isn't much significant change from its predecessors.

Basically,
NodeMCU is Lua Interpreter, so it can understand Lua script easily.
When we write Lua scripts for NodeMCU and send/upload it to NodeMCU,
then they will get executes sequentially. It will not build a binary firmware file of code for NodeMCU to write. It will send Lua script as it is to NodeMCU to get executed.
DHT11 (Basic Temperature and Humidity) Sensor:
The DHT11 is a basic, ultra low-cost digital temperature and humidity sensor. It uses a capacitive humidity sensor and a thermistor to measure the surrounding air and spits out a digital signal on the data pin (no analog input pins needed). Its fairly simple to use, but requires careful timing to grab data. The only real downside of this sensor is you can only get new data from it once every 2 seconds, so when using our library, sensor readings can be up to 2 seconds old.
ThingSpeak Server:
ThingSpeak which is an IoT analytics platform service that allows you to aggregate, visualize and analyze live data streams in the cloud.
ThingSpeak provides instant visualizations of data posted by your devices (or for our case the ESP8266 module) to ThingSpeak. With the ability to execute MATLAB code in
ThingSpeak you can perform online analysis and processing of the data as it comes in. ThingSpeak is often used for prototyping and proof of concept IoT systems that require analytics.

So, this was all about the introduction to the resources we will be using so let's get started.
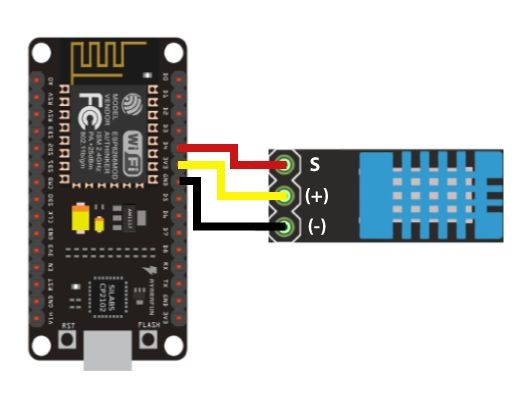
The basic work is to connect the Node MCU ESP8266 with the Temperature and Humidity sensor DHT11. For that identify the (+),(-) and (out) terminals on the sensor and connect them to 3V (Voltage In), G (Ground) and D4 (Digital Signal Port 4) respectively.Design and Working:
Now, within the Arduino application install the libraries. Visit this link Interface DHT11 (Humidity Sensor) Using NodeMCU for installing the libraries (This had been a great help for me). After a successful connection and compilation of the code upload it to the NodeMCU and open the Serial Monitor Terminal to check if it's working.

It should appear like this and if you are successful then you have completed the basic setup.
Now that the temperature sensor is working, we need to set up the wifi connection. Just type the code from Github, replace the "SSID" and "PASSWORD" with your own and then upload it to ESP8266.

After uploading, when you see this output then your ESP8266 is connected to the network.
So, the project is done halfway. Now we need to connect the sensor data to the ThingSpeak server through the wifi module.
Create an account in ThingsSpeak and then create a channel on My Channel.

Enter a name for your channel, add the temperature and humidity fields and save the channel. Then in the channel use the API Keys tab and get the Write API Key (since we intend to write the data onto the server).

So, now we have a server up and running and now we just have to connect the data stream to it. Also, we cannot send data for two fields at a time so we need to toggle the states, i.e. when the state 1 is being executed then we change the state to 2 and vice versa. This helps us to stream to data simultaneously without crashing. Moreover, this was all about the logical part of this project.
Furthermore just in the setup() just connect to the WiFi and then make a WiFi client to be parsed to the ThingSpeak module.
And, in the loop() read the data from the DHT sensor and print them and then push each data onto the server by toggling the states.
This was all about the code. You may have it from my GitHub repo.
After completing all this you'll have a ThingSpeak channel with both the fields updating simultaneously.

You can also edit the graph appearance in the edit menu.
So that is all about Temperature and Humidity Data on Cloud using NodeMCU ESP8266 over ThingSpeak Server. Try it yourself and feel free to share your experience. Also, let me know what you feel about this project.
Comments
Post a Comment